


Choosing ISO to Match My Photography Style
Most of this article is about my own personal philosophy on how I choose ISO for my style of photography. It’s neither right nor wrong in any way. How you want to shoot, and the reasons you have to justify the choices are totally up to you.
The featured image above was shot at ISO 2000, f/13, 1/160.
How People Used to Think about ISO Selection:
The different thought camps tend to cluster into a few recurring positions.
Firstly, there is the “keep ISO as low as possible” doctrine. This position emerged strongly in the early digital era (roughly mid-2000s to early 2010s), when high ISO performance genuinely was poor. Sensors exhibited coarse chroma noise, banding, and limited dynamic range at elevated ISO values. The advice, often phrased as “never raise ISO unless you have no choice”, became entrenched through camera manuals, photography books, workshops, and online forums. The argument was simple: ISO destroys image quality, and noise is irreversible. While true at the time, the rule persisted long after sensors improved.
To be fair, this likely carried over from those who went from 35mm film to using digital. Their expectation of high ISO wasn’t high. And their view probably wasn’t wrong.
Secondly, there is the counter-argument centred on “expose correctly, noise is secondary”. This camp argues that motion blur, missed focus, or insufficient depth of field are categorically worse failures than noise. Proponents often point out that a sharp, noisy image is usable, whereas a clean but blurred image is not. This view gained traction with wildlife, sports, and event photographers, where shutter speed constraints are non-negotiable. The disagreement here is not technical but philosophical: what constitutes an unacceptable failure in a photograph.
My view on this has always been that if the image doesn’t meet any one of several non-negotiable quality specs, that I didn’t want to bother with it.
Third, there is the “ISO is just gain” argument, popularised by discussions of ISO invariance. This group argues that raising ISO in-camera is largely equivalent to brightening a file in post, at least within certain sensor limits. The implication is that ISO choice is less critical than exposure placement and highlight protection. This position often clashes with the first group, particularly when framed in simplified or absolutist terms, leading to heated debate rather than nuanced agreement.
Fourth, there is a resolution-purist argument that has emerged more recently. This view accepts that noise can be reduced but argues that denoising, especially AI-assisted denoising, reduces true spatial resolution and micro-detail. The concern is not visible noise, but credibility of fine detail. This has reignited ISO conservatism among photographers who print large or crop heavily, even on modern sensors.
And as a bit of a pixel-peeper of my own work, I probably fit into this camp.
What ties all of these together is that ISO is not just a technical parameter; it sits at the intersection of aesthetics, workflow, output intent, and historical baggage. The same ISO value can be judged “perfectly acceptable” or “unusable” depending on which failure mode a photographer fears most.
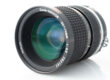
Image shot at ISO 4000.
Rationale: While the subject is sitting on a branch and not in flight, I don’t know what will happen next. This ISO allowed for f/12, 1/750 and with other examples was marginally too slow in shutter speed. Birds are unpredictable. Had it just ‘sat there’, then ISO 100 would have been fine. Click on the image to check for noise at this ISO. Denoised in Adobe Camera RAW.

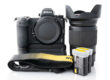
How I Think About ISO with my Nikon Z8:
With modern Nikon cameras, especially recent full-frame mirrorless bodies, much of that inherited caution is no longer proportionate to the results we actually get in practice.
That does not mean ISO has become irrelevant. It means its role has changed.
I shoot mostly with Nikon Z8, and my working view is simple: ISO up to around 3200, and often even 4000, produces files that, after sensible denoising in Adobe Camera Raw, are almost indistinguishable from lower-ISO images at normal viewing and output sizes. That statement is not about pixel-peeping at 200% (even though I do pixel peep). It is about real photographs, used as photographs.
This has fundamentally changed how I prioritise exposure decisions in the field.
My practical ISO ranges:
In day-to-day photography, I still prefer lower ISO values wherever possible. Preference, however, is not the same as fear.
For general photography like landscapes, architecture, slower-paced scenes, I tend to work between ISO 100 and 800. This keeps noise negligible, preserves maximum tonal subtlety, and avoids unnecessary downstream processing.
Rarely, I might use 64, 50, or lower. Usually that’s because I am trying to force a longer shutter speed requirement, not because I think this ISO 12 is somehow better.
For wildlife, particularly birds and animals in motion (some of you have seen my work), my ISO range shifts upward. ISO 1200 to 4000 is routine, or even mandatory. In these situations, shutter speed and aperture are non-negotiable constraints. Motion blur or insufficient depth of field will ruin an image far more decisively than moderate luminance noise ever will.
The key point is that ISO is not my primary creative control.
Example Selections:
Here are some of the selections I make in practice, and some of the rationale behind it.
- Moon: ISO 100-400, never higher. It’s plenty bright. The lit part of the moon is basically like daylight – even when it’s midnight for us, so my exposures are often 1/250 or even 1/1000 with these ISOs. Just use the widest aperture, because at that distance the depth of field doesn’t matter, and the lowest ISO that give you a decent shutter speed to suit your focal length. I shoot the moon hand held with 1200mm focal length, VR stabilised.
- Birds: even if they are sitting still, I use at least ISO 2000, depending on what shutter speed I get. If it’s up at 1/2000 – 1/6000, that’s plenty. I will go to ISO 4000 if my resulting shutter speed looks like it will drop too low (like 1/500) for sudden action, which can happen at any moment. I also shoot in Manual mode, because when shooting flying birds, I want my exposure to remain stable and represent the natural fluctuation of light on the subject.
- If I’m using a tripod: I’ll set the lowest ISO in the standard range, probably 64. Because the fact that I’m using the tripod means that my subject probably isn’t going anywhere. I might even set ISO 12, 25 or 50.
- Static subjects: landscapes; buildings; or people standing or sitting, I’ll probably choose ISO 200, but it could be 100, 200, 400, 640 or 800 depending on the resulting exposure combinations.
Technical photography: like static macro and focus stacking – I will probably choose ISO 64, 100 or 200. - Changing ISO: I do this on the fly. My shutter finger flicks easily between Shutter button and ISO button, which sit right next to each other. If you’re not sure where your ISO button is, learn where it is and learn how to change it without taking the camera away from your face. Modern photography expectations almost demand that you be able to change aperture, shutter and ISO without hardly thinking about it.
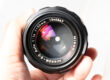
Image shot at ISO 400.
Rationale: While the subject has fast movement, the form factor (shape) of the subject doesn’t change much so there’s little risk in having unacceptablke motion-blur. In fact, some is OK because it would be all in the direction of movement, showing action.

Aperture or Shutter considerations:
Depth of field defines subject isolation, context, and visual hierarchy. If I need a particular aperture to separate a subject from a background, or to hold enough depth across an animal’s body, that aperture choice comes first.
With bird photography it’s a little different, I find I’m almost always on the largest possible aperture for the best separation between subject and background, but it also happens to work well for shutter speed requirements, which need to be from 1/1000 to 1/4000.
With other kinds of photography, my focus and depth of field is a conscious choice. I’m assessing the subject to decide what to set. Aperture and Shutter are considered simultaneously, dictated by subject movement and focal length and ISO is simply the variable that makes the exposure viable, within reason.
So, as a general ‘rule’, I shoot in M mode is because I will chop and change between thinking ‘A’ or thinking ‘S’ depending on the subject and scene, and in ‘M’ mode I can do this instantly.
What post-production actually fixes well:
Modern denoising tools, particularly in Adobe Camera Raw, are extremely effective at cleaning up moderate ISO noise. At ISO 3200–4000, noise is predominantly fine-grained luminance noise rather than aggressive colour blotching. This matters, because luminance noise is far easier to suppress without destroying structure.
With careful denoising—applied globally or selectively—noise can be reduced to the point where it is visually irrelevant in prints, web output, and even large displays. Crucially, this can be done without smearing edges or flattening tonal transitions when used conservatively.
In other words, the cost of moderate ISO is often lower than the cost of compromising exposure at capture.
When I first started trying denoising images with DXO4, my computer was taking >6minutes to process each image. If you experience similar, then your computing power is probably the issue. An investment in a MacBook M4Pro solved this.
I’ve also abandoned DXO4 because I have a suitable tool already right there in Adobe Camera RAW which I actually prefer.
Where high ISO still breaks down, IMHO:
None of the idea of ISO flexibility and denoise applies indefinitely. Ultra-high ISO values still come with real penalties in my opinion.
As ISO climbs, noise reduction becomes increasingly aggressive in post. At some point, detail is not merely hidden by noise; it is replaced by algorithmic reconstruction. Fine textures collapse. Micro-contrast disappears. Resolution becomes nominal rather than real.
This is especially apparent when high ISO files are heavily denoised and then cropped. The combination of sensor noise, spatial averaging, and AI-driven reconstruction can produce images that look superficially clean but lack credible detail on close inspection.
That threshold varies by sensor and by subject, but it exists. Knowing where it lies is part of knowing your camera.
I’ve found that my specific combinations of camera sensor, software, and pixel peeping personality keep me safe below ISO 6400. But when going above that, I stop being happy with the result, so I’m more likely to not bother capturing the image in the first place. With a few exceptions where I’m OK for noise to be part of the creative process.
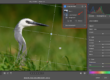
Image shot at ISO 6400.
Rationale: This is getting close to the upper limit of ISO that I like to shoot, but this selection allowed f/8 at 1/15s – slow enough to show plenty of movement, fast enough to keep the subject recognisable, not just a blur. Click on the image to see that post-production denoise cleaned up the noise, but verging on too ‘generated’ in my opinion.

When lower ISO is still the right call:
There are plenty of situations where I will actively choose lower ISO, even if it means accepting some motion blur or working more deliberately.
Static scenes with subtle tonal gradients, fine textures, or large areas of smooth colour benefit disproportionately from low ISO. Landscapes at dawn or dusk, architectural interiors, and long exposures are some examples.
In these cases, the compromise I am willing to make is time: slower shutter speeds, tripod use, or waiting for stillness. Noise reduction cannot fully recover tonal delicacy that was never captured cleanly.
Why I do not use Auto ISO:
Despite modern Auto ISO implementations being highly configurable, I never use them. Mainly because I shoot just about everything in Manual exposure mode. But that comes from using mirrorless. A DSLR is a different matter.
Even with a maximum ISO limit set, Auto ISO removes an explicit decision from the shooting process. It decides when to trade noise for shutter speed, based on rules that are necessarily generic.
I prefer to make that decision myself.
When I raise ISO, I do so knowingly, with an understanding of why it is necessary and what the downstream consequences will be. That intent matters, particularly when working in challenging or fast-changing conditions.
Auto ISO is not wrong. It is simply not aligned with how I think about exposure.
Manual mode and mirrorless control:
As noted, I shoot almost entirely in manual exposure mode. With a camera like the Nikon Z8, this is not a burden, it’s an advantage. Aside from mode flexibility, I can subtly shift image exposure and tonal range to fit my creative vision and I don’t let my camera decide that, or flatten every scene.
Mirrorless exposure preview, histograms, and highlight warnings mean I can see the consequences of my choices before pressing the shutter. I am not guessing. I am evaluating.
This puts the power of exposure back in my hands. I choose the aperture for the look I want. I choose the shutter speed for the motion I need to freeze or convey. I choose the ISO that makes those choices viable.
Mirrorless cameras make this approach practical, fast, and reliable in the field.
Final thoughts:
ISO is no longer the fragile variable it once was. With modern sensors and contemporary post-processing tools, moderate ISO values are a pragmatic solution, not a compromise to be avoided at all costs.
Key Takeaways:
What does it mean to choose ISO for my style rather than avoid noise?
Choosing ISO for your style means prioritising the exposure qualities you value (motion freeze, depth of field, tonal character) instead of reflexively keeping ISO low to avoid noise. Modern sensors and denoising tools often make moderate ISO values acceptable, so the emphasis shifts toward intentional exposure decisions rather than automatic fear of noise.
How have attitudes about ISO selection changed with modern cameras?
Early digital photography emphasised keeping ISO as low as possible because high ISO caused visible noise. Today’s full-frame mirrorless sensors handle higher ISO much better, and sensible denoising in post-processing can make ISO 3200–4000 look almost indistinguishable from lower values in practical use.
What ISO ranges does the author commonly use in different situations?
For landscapes, architecture, and slower-paced scenes, the author prefers ISO 100–800 to preserve subtle tones and minimise noise. For wildlife and action, ISO often sits between ~1200 and 4000 to prioritise shutter speed and freeze motion.
Why does the author avoid using Auto ISO?
The author prefers Manual mode and direct control of ISO because Auto ISO removes an explicit creative choice; it defers the decision about noise vs shutter speed to generic rules rather than intentional exposure judgement.
When is low ISO still the right choice?
Low ISO remains the best option for static subjects, landscapes at dawn or dusk, architectural interiors, and long exposures when a tripod is used. In these cases, slower shutter speeds are acceptable and preserving the finest tonal detail matters more than motion freeze.