


Will I enjoy Infra-Red Photography?
It took me a while to figure out that this was really the underlying question I wanted answered. But that realisation was very valuable. It likely saved me a lot of money and frustration as a result.
So, here’s my practical journey into Infrared photography:
From Curiosity to Control.
My entry into infrared (IR) photography was not only driven by a persistent curiosity about how the world could be rendered when visible light is no longer the dominant constraint, but, to be honest, also a fair bit by wanting to try something that not too many others are.
Like many photographers who arrive at IR after years of working in the visible spectrum, attraction lies in its ability to reinterpret familiar scenes, foliage, sky, architecture, into something simultaneously recognisable and alien.
What follows is an account of that journey, from initial camera selection through to practical shooting considerations and post-production, with particular emphasis on the reasoning behind each decision, the trade-offs involved, and some lessons learned along the way.
This is not a story of acquiring the “best” equipment or following an established formula. Rather, it reflects a deliberate preference for controlled experimentation, incremental investment, and direct engagement with the technical constraints of infrared imaging.
Camera Selection:
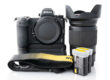
Choosing a Nikon D60 as a Low-Risk Entry Point.
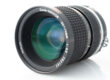
The first significant decision was camera selection. Rather than converting a modern or high-value camera body, I deliberately chose a cheap Nikon D60, and I already had all the lenses because they’re the same as what I already use on my Nikon F4 and F5. This decision was shaped by uncertainty: uncertainty about how deeply I would commit to IR photography, how often I would use it, and whether the results would justify the expense of a more capable or contemporary body, like say a D750 pro DSLR or mirrorless body.
I spent many hours debating this in my head. What mattered most? Quality? Or Experimentation? I landed on the latter.
From an objective standpoint, this choice makes sense for several reasons.
Firstly, IR conversion is irreversible. Once a camera has been modified for infrared capture, its resale value is limited, and its use case becomes specialised. Converting an inexpensive body mitigates financial risk and reduces psychological friction when undertaking invasive modifications. The Nikon D60, being both affordable and plentiful on the used market, fitted this profile well, and it so happened that I already had one which I had loaned to my stepdaughter for school last year. She no longer needed it.
Secondly, I’d checked out tutorials on how to swap the sensor filter, and it seemed that the D60’s simple architecture would reduce the likelihood of me making a mess of it.
Thirdly, while I really wished I had 24MP, the D60 provides adequate resolution and image quality for exploratory work at just 10MP. Infrared photography places different demands on a sensor than conventional photography. Sharpness is influenced by wavelength-dependent focus shift, and tonal rendering often takes precedence over fine detail. In this context, the D60’s limitations are less restrictive than they might be for high-resolution visible-light work. And besides, getting a 24PM body was going set me back by $500+ and that wasn’t worth the risk.
That said, this choice is not without drawbacks.
On the negative side, the D60 lacks modern conveniences such as live view, focus peaking, or advanced metering modes. These omissions make focusing and exposure assessment more difficult, particularly in a medium where conventional visual cues* are unreliable – and especially when comparing to my Z8.
*I’ll explain this at the end.
Dynamic range and high-ISO performance are also modest by modern standards, limiting flexibility in challenging lighting conditions.
Nonetheless, as an entry-level platform for IR experimentation, the D60 represents a rational balance between cost, capability, and acceptable compromise.
Selecting the Infra-Red Filter:
To me, this was about Prioritising Flexibility.
The second major decision concerned the choice of infrared filter wavelength. I opted for a 590nm filter, often referred to as “super colour” infrared, rather than deeper cut-off points such as 720nm or 850nm.
Objectively, this is one of the most flexible choices available in IR photography.
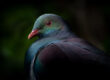
A 590nm filter allows a significant portion of visible red and orange light to reach the sensor alongside near-infrared wavelengths. This produces images with strong colour information prior to channel manipulation, enabling a wide range of creative outcomes in post-production. With appropriate processing, images can be rendered as high-contrast black and white, false-colour landscapes with blue skies and pale foliage, or more experimental colour palettes that are not achievable with deeper IR filters.
From a learning perspective, this flexibility is valuable. It allows a single camera conversion to support multiple visual styles, reducing the need for additional bodies or filter swaps. For a photographer still developing an IR workflow, this breadth of possibility encourages exploration rather than early specialisation.
There are, however, trade-offs.
Compared to 720nm or 850nm filters, 590nm is more susceptible to colour contamination and variability in white balance. Scenes with mixed lighting or reflective surfaces can produce unpredictable colour casts. The images also tend to require more deliberate post-processing to achieve consistent results, particularly if a neutral or monochrome outcome is desired.
In contrast, deeper IR filters produce more uniform results straight out of the camera, at the expense of colour flexibility. Choosing 590nm therefore represents a conscious decision to accept complexity in exchange for creative latitude.
You’ll see what I mean in the image examples below.
Self-Installation of the IR Filter:
Following a Lifepixel Tutorial.
Rather than sending the camera to a professional conversion service, I chose to install the IR filter myself.
Remember, this is not a round filter at the front of the lens. It’s a filter right up against the CCD image sensor inside the camera.
This decision to DIY was informed mostly by cost considerations – professional conversion costs US$250 plus postage each way to the US – that’s about NZ$600 or more altogether. I was also interested in understanding the mechanical and electronic structure of the camera at a deeper level anyway. So, disassembly wasn’t too scary.
I followed an online tutorial provided by Lifepixel. While comprehensive, it was clearly aimed at experienced individuals. The process required fine soldering, careful handling of ribbon cables, and an understanding of how electronic components are layered and interconnected within the camera body. If I didn’t know to read between the lines, I could have messed it up.
This approach has both merits and risks.
The primary advantage is control. Performing the conversion personally provides full visibility into how the filter is seated (which was an actual practical challenge), how dust is managed, and how tolerances are handled. It also demystifies the camera, transforming it from a sealed consumer device into a system of understandable parts. For technically inclined photographers, this knowledge has enduring value.
However, the downsides are substantial. The margin for error is small. Improper soldering, damaged connectors, or misaligned components can render the camera unusable.
As it turned out, I had to do the whole process of assembly twice because of poor alignment between components making the CCD ribbon cable reconnection impossible – it was off by maybe 1/4mm – a very fine misalignment.
Of course, there is no warranty or recourse if something more serious goes wrong too. And, the time investment is non-trivial, particularly for those unfamiliar with precision electronics work.
In this case, the process was successful, but it reinforced an important principle: self-conversion is best suited to those who are comfortable with fine mechanical work and willing to accept the possibility of failure.
This is the original IR cut filter from the camera which had to be removed.

Taking My First IR Images:
White Balance in the Field: Establishing a Usable RAW Baseline:
One of the most consequential practical discoveries was the importance of setting white balance on site. Infrared images, particularly at 590nm, can appear severely colour-skewed when relying on default or automatic white balance settings. This can result in RAW files that are difficult to work with, even before creative processing begins.
- Shoot all images in RAW – forget JPG.
- Shoot using a custom WB defined on site – I actually set it for each scene.
- Bracket exposures. Ideal IR exposures don’t necessarily match what the light meter says.
- Use sufficient depth of field to avoid having too many focus issues – IR focus is not the same as visible light focus. You will need to experiment with setting this correctly if using shallow depth of field or a telephoto lens.
By setting a custom white balance in the field, typically using foliage or grass as a reference*, the RAW file enters post-production in a far more manageable state. Channel clipping is reduced, colour separation improves, and the histogram becomes more usable. This does not lock the image into a final look, but it establishes an optimal starting point.
*I’ll explain this at the end.
Objectively, this approach improves technical quality without limiting creative options. It reduces the need for extreme corrective adjustments later and preserves tonal information that might otherwise be compressed or lost.
The main drawback is operational. Setting custom white balance adds an extra step to the shooting process and needs to be repeated as lighting conditions change. However, the benefits in post-production efficiency and image quality outweigh this inconvenience.
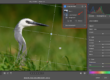
Post-Production Workflow: Structure, Control, and Interpretation:
Post-production is where infrared images are fully realised. If you were expecting to have a near-usable image straight out of the camera, you may be very disappointed, unless of course the ‘out of the box’ look happens to be what you like about it – it so happens I do like it that way in many cases.
This process is entirely creative and personal. There’s no ‘right way’, but here’s ‘my way’:
- Open the RAW image. I’m using Adobe PhotoShop Camera RAW, but I think Lightroom is similar.
- Apply any denoise and sharpen. Don’t worry about how it looks yet.
- The image probably still has a lot of orange cast. Ignore for now.
- Set your exposure, white, black, highlights and shadows settings to your preferred tonal range (remember, ignore orange for now), but keep an eye on any clipping – try to avoid losing tonal data. I usually adjust the Exposure first until the general image looks OK, then move to Whites and Blacks. I stretch them to the point where clipping starts, then back off a little.
If you aim to render a colourised IR image:
- Optionally, try using the custom White Balance correction by using the eye-dropper tool and sampling a spot in the image that you want to render more neutral. I this case, I recommend sampling the grass or foliage – you’re working with a strange spectrum and none of that will be green any more.
If you aim to render a B&W high contrast image:
- Optionally, change the setting to B&W now and apply AUTO B&W balance – or play with the colour sliders to make specific colours in the image yield lighter or deeper blacks or whites.
- To deepen the blue sky to a darker grey or black, adjust the orange and red channels.
- You could easily have a final image at this point but play with controls for different effects.
If you chose to do a colour image:
- You can either use the orange-sky version of your image as your final image, OR:
- Open the image in PhotoShop and then go to the Channel Mixer, in the Red channel, change red setting from 100 to 0, and blue from 0 to 100. In the Blue channel, change the blue setting from 100 to 0, and change red from 0 to 100. This is called “Channel Swapping”. You are exchanging reds for blues and vice versa.
- Now instead of an orange sky, your sky is probably blue and more natural looking, while foliage is a light pink.
- If you don’t like the harsh blue colour (I didn’t), then you can play in PhotoShop to adjust layered filters: Colour, Hue, Saturation, Temperature, etc to get the desired effect. Check out my examples below.
Adjust Exposure, Whites, Blacks etc but avoid channel clipping.

Perform a Red and Blue channel swap using the Channel Mixer.

Apply filters as layers to avoid permanently losing any underlying data in your image.

Key points to consider for your workflow if you try this yourself:
- Experiment with how the initial, white-balanced RAW file behaves compared to an unbalanced one.
- Channel swapping or mixer adjustments for false-colour effects. Go nuts! There are no rules for this, so do whatever you like. But keep in mind that if you want to preserve image details, try not to clip any channels.
- Conversion to black and white and tonal separation techniques. You can go ‘AUTO’ but play with it to find what you like.
- Managing noise, contrast, and highlight roll-off specific to IR imagery. This is where shooting with custom WB helps, because it helps centre your data in the spectral range. But the actual exposure itself matters too, because over and under exposure doesn’t behave quite the same way as normal visible light spectrum.
- Note down any presets or repeatable frameworks you have developed yourself so that you can repeat them later.
Remember when shooting IR, there is no ‘right way’. This is up for interpretation, and we are all going to get different results.
Conclusion: A Deliberate, Technical Exploration
This journey into infrared photography has been defined less by gear acquisition and more by controlled experimentation. Each decision, from choosing a cheap camera body, to selecting a flexible filter wavelength, to performing the conversion personally, was guided by a preference for understanding over optimisation.
Infrared photography rewards this approach. It exposes the assumptions embedded in conventional photographic workflows and demands a more active role from the photographer, both technically and creatively. The result is not just a set of images, but a deeper engagement with the medium itself.
For those considering a similar path, the lesson is not to replicate these exact choices, but to adopt the same underlying mindset: start deliberately, accept constraints, and allow technical understanding to inform creative freedom.
It cost me about $250 all up, including the separate IR filter, bought from two different sellers on eBay. Effort into the conversion took 2 hours (and some frustration). But this whole solution would have cost >$800 if bought as ‘done for me’.
I am just at the beginning of this journey!
So, do I like IR photography?
I think I do.
Postscript:
Conventional visual cues for Exposure:
Your camera’s light metering may fool you. What looks bright to your eye may be dark in the IR capture, depending on the filter type you selected. Because I am using a 590nm, I have a very high mix of both daylight and IR light, but because I can’t personally see the IR intensity, I can’t know what bit of the image is the brightest, so I don’t know where to measure exposure off.
For these reasons, I’d suggest trying bracketing until you get used to it.
Setting WB typically using foliage or grass as a reference:
Under a 590 nm conversion, chlorophyll causes foliage to reflect a very strong and relatively consistent near-infrared signal. This makes vegetation one of the most stable and dominant reflectors in typical IR scenes. When you set a custom white balance on foliage, you are not neutralising colour in the conventional sense; instead, you are anchoring the camera’s colour matrix to the dominant IR reflector in the scene.
The practical outcome is that:
- Red channel clipping is reduced.
- Blue and green channels are pulled back into a usable range.
- The RAW file becomes properly centred in the histogram.
- Channel separation improves for later swapping or mixing.
- Adobe Camera Raw / Lightroom are less likely to hard-clip channels on import.
In other words, foliage WB is not about colour accuracy; it is about maximising data usability.
Key Takeaways:
What kind of photographer is infra-red photography best suited to?
Infra-red photography tends to suit photographers who enjoy interpretation over realism. If you’re comfortable letting colour, contrast, and tonal relationships depart from how a scene looks to the eye, IR can feel liberating. If your satisfaction comes from faithful reproduction, it often feels frustrating rather than creative.
Why do some photographers lose interest in infra-red after trying it?
Because infra-red removes familiar visual anchors. Skies, foliage, and skin tones behave differently, and many compositional cues no longer apply. If the novelty wears off and the altered rendering doesn’t align with how you see or pre-visualise scenes, motivation drops quickly.
Does infra-red photography work better for certain subjects?
Yes. Scenes with strong foliage, open skies, simple geometry, or graphic contrast tend to respond well to infra-red. Busy scenes, cluttered environments, or subjects that rely on natural colour relationships often become harder to resolve convincingly in IR.
Is infra-red photography mainly about post-processing?
Post-processing plays a large role, but enjoyment depends more on capture-stage intent. If you enjoy experimenting with tonal separation, channel mixing, and abstraction, IR processing feels purposeful. If you expect processing to “fix” weak compositions, it quickly becomes tedious.
How can I tell if I’ll enjoy infra-red before converting a camera?
Look at infra-red images and ask whether the rendering feels expressive or distracting to you. If you find yourself mentally “correcting” the scene back to normal colour, IR is unlikely to suit you long-term. Enjoyment usually shows up immediately at the conceptual level.
Images processed in Camera RAW with just basic adjustments in WB, exposure, whites and blacks.


High contrast Black and White versions:


Red and Blue channels swapped, and processed further in PhotoShop: